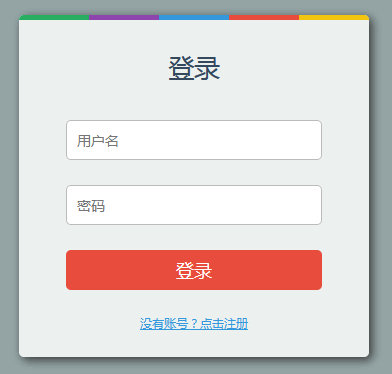
纯CSS3实现简约又漂亮的用户登录框【演示/源码下载】
作者:admin 时间:2021-4-15 1:28:54 浏览:用户登录框是一个非常常见的UI界面,无论是移动端还是PC端。不少人使用了图片以设计出漂亮的UI视觉效果,不过其实用纯CSS3代码也可以设计出简约大方而又漂亮的用户登录框UI布局出来。本文给大家介绍一下实现代码。

纯CSS3实现简约又漂亮的登录框
CSS代码
* {
box-sizing: border-box;
margin: 0;
padding: 0;
}
html {
background: #95a5a6;
font-family: 'Helvetica Neue', Arial, Sans-Serif;
}
html .login-wrap {
position: relative;
margin:180px auto;
background: #ecf0f1;
width: 350px;
border-radius: 5px;
box-shadow: 3px 3px 10px #333;
padding: 15px;
}
html .login-wrap h2 {
text-align: center;
font-weight: 200;
font-size: 1.6em;
margin-top: 20px;
color: #34495e;
height:50px;
}
html .login-wrap .form {
padding-top: 20px;
}
html .login-wrap .form input[type="text"],
html .login-wrap .form input[type="password"],
html .login-wrap .form button {
width: 80%;
margin-left: 10%;
margin-bottom: 25px;
height: 40px;
border-radius: 5px;
outline: 0;
-moz-outline-style: none;
}
html .login-wrap .form input[type="text"],
html .login-wrap .form input[type="password"] {
border: 1px solid #bbb;
padding: 0 0 0 10px;
font-size: 14px;
}
html .login-wrap .form input[type="text"]:focus,
html .login-wrap .form input[type="password"]:focus {
border: 1px solid #3498db;
}
html .login-wrap .form a {
text-align: center;
font-size: 12px;
color: #3498db;
}
html .login-wrap .form a p {
padding-bottom: 10px;
}
html .login-wrap .form button {
background: #e74c3c;
border: none;
color: white;
font-size: 18px;
font-weight: 200;
cursor: pointer;
transition: box-shadow .4s ease;
}
html .login-wrap .form button:hover {
box-shadow: 1px 1px 5px #555;
}
html .login-wrap .form button:active {
box-shadow: 1px 1px 7px #222;
}
html .login-wrap:after {
content: '';
position: absolute;
top: 0;
left: 0;
right: 0;
background: -webkit-linear-gradient(left, #27ae60 0%, #27ae60 20%, #8e44ad 20%, #8e44ad 40%, #3498db 40%, #3498db 60%, #e74c3c 60%, #e74c3c 80%, #f1c40f 80%, #f1c40f 100%);
background: -moz-linear-gradient(left, #27ae60 0%, #27ae60 20%, #8e44ad 20%, #8e44ad 40%, #3498db 40%, #3498db 60%, #e74c3c 60%, #e74c3c 80%, #f1c40f 80%, #f1c40f 100%);
height: 5px;
border-radius: 5px 5px 0 0;
}
HTML代码
<div class="login-wrap">
<h2>登录</h2>
<div class="form">
<input type="text" placeholder="用户名" name="un" />
<input type="password" placeholder="密码" name="pw" />
<button> 登录 </button>
<a href="#"> <p> 没有账号?点击注册 </p></a>
</div>
</div>
代码解释
1、我们注意到,表单头部表框是一条有5种颜色的彩色线条,是用如下CSS代码实现的。
我们可以修改线条的颜色代码(如 #27ae60 代表第一段线条颜色),还可以修改线条的高度(height)和圆角(border-radius)大小。
html .login-wrap:after {
content: '';
position: absolute;
top: 0;
left: 0;
right: 0;
background: -webkit-linear-gradient(left, #27ae60 0%, #27ae60 20%, #8e44ad 20%, #8e44ad 40%, #3498db 40%, #3498db 60%, #e74c3c 60%, #e74c3c 80%, #f1c40f 80%, #f1c40f 100%);
background: -moz-linear-gradient(left, #27ae60 0%, #27ae60 20%, #8e44ad 20%, #8e44ad 40%, #3498db 40%, #3498db 60%, #e74c3c 60%, #e74c3c 80%, #f1c40f 80%, #f1c40f 100%);
height: 5px;
border-radius: 5px 5px 0 0;
}
2、HTML代码里的placeholder是占位符,提供可描述输入字段预期值的提示信息。该提示会在输入字段为空时显示,并会在字段获得焦点时消失。
<input type="text" placeholder="用户名" name="un" />
<input type="password" placeholder="密码" name="pw" />
3、如下CSS代码是设置登录框的背景、宽度、阴影、圆角大小等。
html .login-wrap {
position: relative;
margin:180px auto;
background: #ecf0f1; /* 设置登录框背景 */
width: 350px; /* 设置登录框宽度 */
border-radius: 5px; /* 设置登录框圆角大小 */
box-shadow: 3px 3px 10px #333; /* 设置登录框阴影 */
padding: 15px;
}


