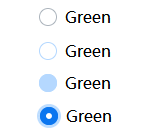
如何仅使用HTML和CSS创建自定义单选框radio
作者:admin 时间:2022-8-15 20:8:34 浏览:在上一文中,我们介绍了纯CSS创建自定义复选框Checkbox,在本文中,将介绍如何仅使用HTML和CSS创建自定义单选框radio。

HTML
<input class="custom-radio" name="color" type="radio" id="color-green" value="green">
<label for="color-green">Green</label>
HTML是由一个<input>和<label>标签组成。
隐藏input
因为我们要自己创建控件,所以要先隐藏原始控件。
.custom-radio {
  position: absolute;
  z-index: -1;
  opacity: 0;
}
opacity: 0 是透明度设置,0表示该元素是透明的,不可见的。
创建单选框radio
.custom-radio + label {
  display: inline-flex;
  align-items: center;
  user-select: none;
}

.custom-radio + label::before {
  content: '';
  display: inline-block;
  width: 1em;
  height: 1em;
  flex-shrink: 0;
  flex-grow: 0;
  border: 1px solid #adb5bd;
  border-radius: 50%;
  margin-right: 0.5em;
  background-repeat: no-repeat;
  background-position: center center;
  background-size: 50% 50%;
}使用伪元素::before可以模仿创建出单选框radio。
:checked状态下的单选框radio
.custom-radio:checked + label::before {
  border-color: #0b76ef;
  background-color: #0b76ef;
  background-image: url("data:image/svg+xml,%3csvg xmlns='http://www.w3.org/2000/svg' viewBox='-4 -4 8 8'%3e%3ccircle r='3' fill='%23fff'/%3e%3c/svg%3e");
}
:hover、:active、:focus 和 :disabled 状态的样式
.custom-radio:not(:disabled):not(:checked) + label:hover::before {
  border-color: #b3d7ff;
}

.custom-radio:not(:disabled):active + label::before {
  background-color: #b3d7ff;
  border-color: #b3d7ff;
}

.custom-radio:focus + label::before {
  box-shadow: 0 0 0 0.2rem rgba(0, 123, 255, 0.25);
}

.custom-radio:focus:not(:checked) + label::before {
  border-color: #80bdff;
}

.custom-radio:disabled + label::before {
  background-color: #e9ecef;
}
总结
本文介绍了如何仅使用HTML和CSS创建自定义单选框radio,伪元素::before的使用是关键。巧妙地使用伪元素,你可以做很多事情,如前面介绍过的:
相关文章
相关文章
x


